Thursday, May 12, 2016

Cheesecake for Chums


Our friends Y and J invited us over for dinner last weekend, and as usual, I volunteered to contribute dessert! It had been ages since I had last made a cheesecake, one of my favorite comfort foods...and it was just one of those weeks when a good cheesecake was just what I needed. My friends and I would experiment with different flavors in college, and this time I tried coffee Kahlua. Here is my recipe!

Eggless Coffee Kahlua Cheesecake

Ingredients:
16oz of cream cheese at room temp (2 packs)
8oz of sour cream
1/2 cup sugar
1.5 tbsp of finely ground coffee
1/3 cup Kahlua
1 chocolate graham crust
Vanilla frosting to decorate (optional)

Mix the cream cheese, sour cream, and sugar. Add the coffee to 1/4 cup of boiling water, and let brew for 3-5mins. Add the coffee mixture (including grounds) and Kahlua to the cream cheese mixture. Pour into the crust and make for 60min at 375°F. Let cool in refrigerator for at least 1h before serving. I piped on a quick rose with vanilla frosting, just for fun!


Sunday, March 27, 2016

They don't wants us to write this post...

...but what are we gonna do? We're going to to write this blog post! My husband, A, is obsessed with Snapchat sensation @djkhaled, so #majorkeyalert: when making a cake for someone, play to their current obsessions.   


This was a chocolate, coffee, Bourbon cake...all of his favorites for his big 3-0! 
Here is the semi-homemade recipe:

Ingredients:
1 box of Duncan Hines Devil's Food Cake Mix
1/3 cup Bourbon
1 cup of milk
3 tbsp of extremely finely ground coffee
Cream cheese frosting to decorate

Mix together all of the cake ingredients with an electric whip. Bake at 350°F for 26min. Frost and enjoy!


Saturday, February 20, 2016

Dub Nation!


Everyone in my family is a HUGE Warriors fan. And after being loyal fans for literally decades, my dad and brother are really deserving of the most recent two seasons! My dad religiously watches every game, and even tries to stream them when he is abroad. So, for his birthday last weekend, I made him some Mexican Chocolate Golden State Warriors cupcakes, complete with the Bay Bridge logo, basketball logo, and players' jersey numbers. I threw in an extra jersey number, 60, to celebrate his big 6-0! 


Here is my semi-homemade, eggless recipe. Since it was my first time making Mexican Chocolate I went easy on the spices, and the flavor was subtle. Next time, I am going to amp it up even more. 

Ingredients: (makes ~18 cupcakes)
1 box of Dunkin Hines Devil's Food Chocolate Cake Mix
1 1/4 cup milk
1 frozen banana
1 tbsp vegetable oil
2 tsp cinnamon powder
1/4 tsp red chili power (or more to taste)
vanilla frosting & food coloring to decorate

Mash up the frozen banana, and mix all of the batter ingredients using an electric whip. Pour into silicone cupcake molds and bake at 350F for 21-24 minutes. Let the cupcake completely cool before frosting. I added the blue detail by making a make-ship ziplock piping bag. 

Enjoy and Let's go Dubs!!!
#dubnation #letsgowarriors #curryfever 


Thursday, February 18, 2016

Sweet Snitches


A bunch of my friends and family members have V-day birthdays, and I ended up baking 45 cupcakes last week! The first batch was for my friend T, a huge Harry Potter fan. She was a patronus for Halloween, and can practically recite all of the books. So, I thought these golden snitch cupcakes would the perfect surprise for her birthday. These were banana-chocolate cupcakes frosted with yellow-dyed vanilla frosting with yellow decorating sugar. I printed .out the wings with tabs that I could stick into the cupcakes on thick paper. These flying snitches were the perfect addition to the pizza party we had for T at work--all we were missing was some butterbeer. One of our coworkers, who was Harry last Halloween and a real-life Harry doppelganger, reenacted the scene where Harry caught the snitch in his mouth ;-)


Sunday, February 7, 2016

Superbowl Sunday!


It is Super Bowl Sunday, and a very exciting one at that, as it is being hosted in the Bay Area. The best part of Super Bowl parties are the treats, and football cupcakes are so easy, while delicious and perfectly themed.  Just pipe some laces on freshly baked chocolate cupcakes...touchdown!

I got to explore some of Super Bowl City this weekend #SB50, and really loved all of the projections on various skyscrapers, and the fireworks shows over the Ferry Building. Hope you got a taste of all the excitement too! Now off to go root for a great halftime show and funny ads :)


Saturday, January 30, 2016

Playfully Poached Pears


Our friend V invited us over on Friday for a dinner party. Her spread was amazing! I decided to contribute a dessert, and was in the mood for a fruit tart. However, it is so hard to find good fruit in the winter, even here in California, and this makes winter fruit tarts a bit of a challenge. I found pears at the produce market, and decided to try a pear tart in bourbon caramel. I used the same rose pattern as my apple tart, but with pears and--did I mention--bourbon caramel :)


Ingredients:
3 pears (bosc or d'anjou would work well, and red d'anjou would look even prettier!)
9'' pie crust (homemade or store bought)
1/2 cup of orange juice
5-7 tbsp of brown sugar to taste
1/2 tsp cinnamon
1/8 tsp clove powder
4 tbsp bourbon

Slice the pears 1/16 - 1/8'' thick. Toss the pears with 1-2 tbsp of sugar. Arrange pears in the pie crust (I roughly added a layer of pears on the bottom before assembling the rose to add height.) In a small saucepan, add orange juice, remaining sugar, and spices. Bring to a boil, and then reduce to low and let simmer for 5min (stir continuously). Add the bourbon, and continue to simmer and stir until it thickens to a caramel sauce. Pour evenly over the pie, and bake at 400°F for 20-25min.  

A is out of the country, and didn't get to try any, so I know I'll be making this again!

Sunday, January 24, 2016

Kool Kulfi


Growing up, my mom always made the best mango kulfi (mango un-churned ice cream), and so I decided to take a stab at it. I have to admit that my version is no where near as good as hers, so I will have to get her recipe or continue to experiment. Still, I think it was a decent first stab. Here is the recipe, and I'll update as I continue to revise it!

Ingredients (makes 12-14):
2 cups of milk
1 can (15oz) of mangos
3 tbsp almonds
1/4 - 1/2 cup sugar (to taste)
2 tbsp corn starch dissolved in 3 tbsp milk

Soak the almonds in water for at least an hour. Once soaked, the peels should easily come off. Heat the milk on low for 15min. Add the sugar and let it completely dissolve. Add the corn starch mixture, and continue to heat on low (continuously mixing) until the milk mixture thickens to the consistency of a cream sauce (try to get it as thick as possible, without getting any lumps). Use a blender to liquefy the mangoes and almonds into a smooth pulp. Add the thickened milk to the mango mixture, mix well, and pour into silicone molds. Freeze until hardened. Enjoy!

Addendum: I just made these for a second time and they came out waaayy better! Here are some revisions to the recipe: 1. I increased the amount of sugar from 1/4 to 1/3 of a cup, 2. I used less corn starch 1-2 tsp, 3. I strained the milk before blending with the mangoes to remove any lumps, 4. I drained the mangoes before adding, 5. after fully blended, I used the 'whip' setting of the blender for a while--this made the end product a lot creamier. The straining and draining reduces the quantity, but it is well worth it!

Thursday, December 24, 2015

Attack of the Red-Nose Clones


Happy Holidays from Playful PaletTe! 


This year, my company had an epic holiday bake-off! There were almost 20 entries, and we stuffed ourselves with Nutella filled chocolate chip cookies, amazing ginger snaps, homemade peppermint patty ice cream, dark chocolate crackle top cookies, caramel filled snickerdoodles, and savory blue cheese cookies topped with apricot jam. I literally tried one of everything, with the help of a big glass of milk, and practically had to be rolled home--what an amazingly talented group of coworkers I have! 


I contributed the "most-festive" treat on the lot, my chocolate cinnamon Rudolph cakes. They were complete with M&M or Hot Tamale noses, and pretzel antlers. They were also eggless, but not dairy free (substitute milk for soy or almond milk for a vegan recipe). I think next time, I will increase the amount of cocoa powder as well.


Recipe:
1/3 Box of Dunkin Hines Devil's Chocolate cake mix
1 Box of Dunkin Hines Yellow cake mix
1 1/2 cup of milk 
1 tsp cinnamon
1/4 cup cocoa powder
1 tbsp vegetable oil
1/2 tsp vanilla

To decorate:
Cream cheese frosting
M&M and/or Hot Tamales
Pretzels

Mix everything, and use an electric whip to aerate. Pour into silicone molds. Bake at 350°C for 20-25 mins. Remove from molds once cooled. Break the pretzels in half and insert as antlers. Pipe the eyes on using a ziplock bag, and top with a red nose! So easy and so fun!


Thursday, November 26, 2015

Clucking Cupcakes


Happy Thanksgiving!!!


Happy Thanksgiving from the Playful PaletTe family to yours! I have so much to be thankful for this year, including an amazingly loving family, wonderful friends, a great job, and tons of yummy food. This year, I added some clucking red velvet cupcakes to my mom's Thanksgiving table spread!

Do you remember making hand turkeys in grade school? Tracing your hand and decorating your turkey using every color in your box of Crayola markers? It is one of my favorite fall memories, and the one I channeled in decorating these gobbling cupcakes. A frosting hand and some colorful sprinkles gave me the vegetarian version of Thanksgiving turkeys.  I used my usual "semi-homemade" recipe:

Ingredients:
1 box of Dunkin Hines Red Velvet cake
2 tbsp of instant coffee powder
2 tbsp of cocoa powder (optional for a stronger chocolate flavor)
1 1/3 cup milk
cream cheese frosting
chocolate frosting and sprinkles to decorate


Whip together the cake mix, cocoa powder, coffee powder, and milk. Add a couple heaping tablespoons each into silicon cupcake molds. Bake at 350°F for 20 mins. Once cooled, frost with the cream cheese frosting, and decorate! (I used a Ziplock bag as my piping bag!)

And here is a picture of my mom's unconventional, vegetarian, Indochinese, super delicious Thanksgiving meal, complete with hot and sour soup, dumplings, gobi manchurian, green beans, fried rice, noodles, bakes apples with roasted pecans and ice cream, and my cupcakes! :)


I hope you all have a wonderful Thanksgiving!


Sunday, November 15, 2015

Pretty Petal Pie


It is apple pie season, and here is my upside-down, apple-crumble pie! I think you can have a lot of fun with the arrangement of fruit on a pie, and that it is a place where you can get very artistic. However, I also love the texture of a good granola crumble. So, the "upside-down" part of this crumble pie, is that the granola crumble is on the bottom. I brought this to a family dinner with A's cousins, and I think everyone really enjoyed it!

Ingredients:
9'' pie crust (store bought or homemade)
2 handfuls of granola (if unsweetened, mix with sugar, cinnamon, and honey to taste!)
3 apples (Golden Delicious or Granny Smith)
6-8 tbsp of granulated sugar (to taste)
1-2 tsp of cinnamon powder
1/2 tsp nutmeg
1 tbsp lemon juice


Preheat oven to 350°F. Wash and cut the apples into equal 1/8'' slices. The more even you can get your slices the more even the rose will turn out. Toss in a large bowl with sugar, cinnamon, nutmeg, and lemon. Add your granola mix to the bottom of your pie crust. Next, start to place the apple slices up-right in the crust, starting from the outside and moving in. Overlap the slices such that each new slice covers half of the previous. Use your hands to support the ring as you go. The slices will hold themselves up when the pie is tightly packed. In the center, use any smaller/thinner pieces you might have. If you have extra slices in the end, go back and fill in any areas that seem to have holes. Sprinkle with water before baking, so the apples stay moist. Bake for 45min, or until the apples get soft. (I pre-baked it for 30mins, and then finished it for 15min right before eating.) Enjoy warm! Best with vanilla ice cream!


Want more apple recipes for the fall? Here are a few from last year:

Wednesday, November 11, 2015

Happy Diwali!!


Wishing Everyone A Very Happy Diwali! 


Diwali is the Indian festival of lights, when people decorate their porches with colorful rangolis (colored chalk designs) and tons of little dias (petal-shaped oil lamps). Friends and family celebrate by lighting firecrackers and exchanging sweets. 

I am not biggest fan of Indian sweets, but I remember my mom making us Indian almond butter cookies (Nankhatai) when I was little. I decided to make them in the shape of dias with little almond flames. I asked my mom for the recipe, but had to modify since I didn't have all of the ingredients. 


Ingredients (makes ~18 small cookies):
1 cup white flour
1/4 cup whole-wheat flour (or chickpea flour)
2 tbsp cream of wheat
2/3 cup powdered sugar
1/2 cup butter--melted (or ghee)
1/2 tsp baking soda
1 tsp baking powder
3/8 tsp nutmeg
1/2 tsp cardamom powder (I used clove powder as I didn't have cardamom)
3 tbsp milk
a handful of whole almonds

Whip together the butter and sugar using an electric beater until creamy. Add the flour, cream of wheat, baking powder, baking soda, spices, and milk and knead into a soft dough. Roll into even balls, flatten, and pinch into teardrop shapes. Place on a greased baking sheet (cookies will expand so leave space between them). Refrigerate for a few minutes so cookies keep their shape while baking. Preheat oven to 350F and bake for 15min. Take the cookies out, insert the almonds, and gently reshape any misshapen cookies. Bake for another 5-10 minutes until slightly browned. Enjoy!

And in the spirit of Diwali, I thought I would do a throwback to my favorite rangoli. Can you believe it has already been an year and a half?!


Sunday, October 25, 2015

Blue Apron Adventure #4

Yet another Blue Apron box to play with...my favorite so far as I got to make arepas (Venezuelan corn bread) and pierogi (Polish dumplings) for the first time! 

Ricotta Pierogi:


This dish was very rich, but delicious. We stuffed Chinese dumpling wrappers with spiced (poppy seed, nutmeg, caraway seed) ricotta cheese and browned them in butter. The dipping sauce was spiced sour cream. This came with a side of fennel, apple, cabbage slaw. 

Broccoli and Fennel Casserole:


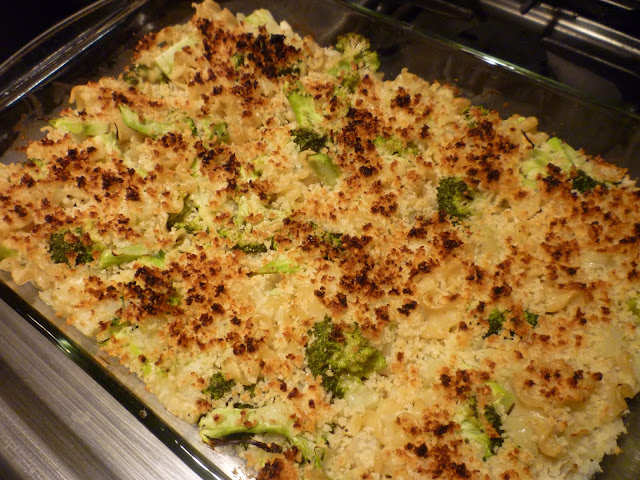
Basically fancy mac and cheese :) This was a baked pasta dish with a fontina cheese and milk sauce, with fennel and broccoli. Its spice mix included ground mustard, fennel seeds, and bay leaves. It was topped with breadcrumbs, pecorino cheese, and lemon. 

Queso and Pepper Arepas:


And last but not least, our favorite, the arepas. 'A' came home early to make these with me! We started with masarepa (corn flour) and ended up with soft cakes with crispy crusts. The flour is put together with lime zest, water, and a bit of olive oil. We first browned them on the stove and then finished them in the oven. We stuffed them with grilled bell peppers, poblano peppers, and queso fresco. The final touch was a chimichurri sauce with fresh parsley, cilantro, garlic, oil, and vinegar. The arepas came with a side of kale and avocado salad, with almonds, lime, mayonnaise, olive oil, and garlic. 


Tuesday, July 28, 2015

Blue Apron Adventure #3

A and I were super excited to recently get a couple of Blue Apron boxes from my MIL for our 1st anniversary. Blue Apron boxes fit my usual cooking style perfectly--I make a few simple recipes over the weekend to feed myself for the week, with the added perks of getting to try out new recipes and play with ingredients that I have never used before. We really enjoyed all of the recipes in last week's box, and I hope these pictures show you why! We will definitely be making all of these dishes again, especially the quesadillas with corn. 

First up was a Barley Risotto


The barley risotto had Romano beans, fennel, and parsley in it, and was topped with cherry tomatoes and basil. I really liked the idea of using barley instead of rice for a healthier risotto. The texture of the barley (al dente) worked really well. I also enjoyed getting to use Romano beans and fennel, which I had never used before. I loved the smell of the fennel on my chopping board while cooking! It was a decadent and flavorful meal, that made for perfect lunches for my work week! However, A still claims that his mushroom risotto recipe is better. I am challenging him to prove it, by making it again and guest posting his recipe on my blog!


Up next, Squash and Squash Blossom Quesadillas with Corn-on-the-cob


The quesadillas were stuffed with grilled slices of summer squash, garlic, ancho and chipotle spices, Monterey Jack cheese, and squash blossoms. It was my first time cooking squash blossoms. They are so beautiful, I almost didn't want to cook them! They added a great unique flavor to the quesadillas. I threw some avocado on the plate too, because, why not?


The Blue Apron recipe described boiled corn, but the Indian in me can never resist grilled corn! I grilled it on my gas stove, till charred. We then topped it with Mexican crema, lime juice, salt, pepper, ancho and chipotle spices, Cotija cheese, and lime zest. It was the most dressed up corn I have ever had, and amongst the most delicious. This was our favorite meal in this box--restaurant quality for sure!

And last, Szechuan Eggplant over Rice


We made a stir-friend Japanese eggplant dish with shishito peppers, garlic chives, ginger, soy glaze, sesame oil, and chili garlic sauce. Shishito peppers are long green peppers that aren't too spicy. The recipe has us throw them in there whole, with tops still on, for aesthetics. On the side we made a simple cucumber salad. The eggplant was quick, easy, and very tasty!

This was my 3rd time getting to play with the Blue Apron boxes, and I have to say that I always enjoy it! Check out my past two Blue Apron adventures here and here!

Saturday, July 4, 2015

Independence Indulgences


I wanted to bring something festive and summery to the 4th of July BBQ we are going to today, and decided to make these colorful lemon cakes. I used decorative sugar to make the silhouettes of stars on the tops, and colored my batter to make red, white, and blue stripes on the inside. I like how they came out a bit psychedelic and abstract! They are super yummy too!


Here is the semi-homemade recipe:

Ingredients:
1 box of Duncan Hines Lemon Supreme cake mix
zest of 2 lemons
1 1/3 cup milk
food coloring
decorative sugar

Whip together the cake mix, zest, and milk. Use an electric whip to make the batter light and fluffy. Separate the batter into three parts, and dye one part red and one part blue. Spoon in the blue, red, and white batter into your cupcake cups, and be careful not to mix the layers. Make an aluminum foil star stencil, and lightly rub some oil on it so that it doesn't stick to the batter. Place the star on each cake, and sprinkle the decorative sugar around it. Be careful when lifting up the piece of foil (see below). Bake at 350°F for ~18minutes. Enjoy! 


Tuesday, June 30, 2015

Happy 1st Birthday Playful Palette!

I can't believe Playful Palette is already a year old! Honestly, I am the queen of unfinished projects--I have countless unfinished embroideries and paintings, and a finished painting that has been waiting to be hung up for over a year--so I am quite proud of myself to have made it a whole year with the blog! In honor of Playful's 1st birthday, I thought I would look back at some of my favorite posts from the year! Click through and check out what you may have missed!

http://playfulpalette.blogspot.com/2014/11/exuberant-ellie.html
http://playfulpalette.blogspot.com/2014/11/ap-petite-apple-ap-pie.html
http://playfulpalette.blogspot.com/2014/07/plum-palette.html
http://playfulpalette.blogspot.com/2014/07/tattooed-treats.html
http://playfulpalette.blogspot.com/2015/05/daisies-for-mommy-dearest.html
http://playfulpalette.blogspot.com/2014/10/tandoori-tofu.html 
http://playfulpalette.blogspot.com/2014_06_01_archive.html
http://playfulpalette.blogspot.com/2014/09/the-not-ice-cream.html